CustomBlocks Basics
CustomBlocks are Blocks for which you define rules and constraints that let you quickly change their size, rotation, and appearance when you insert them into drawings.
Use CustomBlocks when you have several similar Blocks in your project. CustomBlocks reduces your drafting time and the number of Blocks to manage.
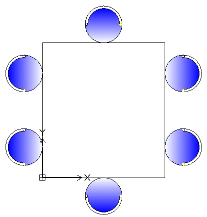
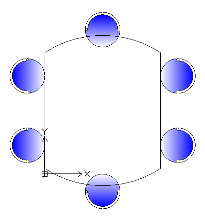
For example, you can define a single CustomBlock to represent a rectangular table with chairs in a drawing. You can use the CustomBlock to represent other tables with various lengths while maintaining the size and relative positions of the chairs. You can modify the CustomBlock to represent tables with a different number of chairs or tables with other shapes.
In addition to the geometric entities, CustomBlock definitions contain special features, such as elements, activities, and constraints:
- Elements define grip points and custom properties for the CustomBlock.
- Activities specify how the CustomBlock reference moves or changes when you manipulate grip points and modify custom properties.
- Constraints define relationships between entities of the CustomBlock.
You can create a CustomBlock from any existing Block by adding the features to the Block definition in the Block Editor.
CustomBlock features let you:
- Create additional grip points on a subset of entities in a Block to allow move, stretch, rotate, scale, pattern, and mirror (elements and activities)
Elements such as point, linear, polar, XY, rotation, and mirror define grip points on geometric entities in a Block. You can apply activities to each element. In the Block reference, activities behave similar to the commands. See Adding Elements.
- Define predefined sets and values for custom properties
You can use value tables to associate a list of custom property values to a CustomBlock. See Associating Data to CustomBlocks.
- Define specific constraints to maintain relationships between Block entities. See Working with Constraints.
- Restrict entity dimensions to specific values and increments (value sets)
- Define sets of entities to display in a Block reference
You can use visibility states to specify which entities of the CustomBlock appear in the Block reference. See Controlling the Visibility of CustomBlock Entities.
After inserting a CustomBlock into a drawing, you can select it and modify the CustomBlock appearance using the grip points and custom properties that you added in the CustomBlock definition. For example:
- Modify Block references within specific constraints
- Select between variants in a Block
- Change the appearance by turning certain entities on or off
- Cycle through a set of base points when inserting CustomBlocks
- Specify forms and sizes from predefined sets and values
Note: Use the ResetBlock command to reset Block references to default values of the CustomBlock definitions.
Differences Between Simple Blocks and CustomBlocks
- The reference of a simple Block always has only one grip point at the Block base point. A CustomBlock reference has additional grip points, which you specify in the CustomBlock definition.
- All Block references of a simple Block look exactly the same. Moreover, changing a Block reference changes the Block definition and all Block references. CustomBlock references may have different appearances and you can modify them separately from the CustomBlock definition. Changing a CustomBlock reference does not update all references.
The Block Editor
The Block Editor is an environment where you can draw and modify geometric entities of Blocks. Additionally, the Block Editor provides tools for adding constraints, elements, and activities to a CustomBlock definition.
To open the Block Editor, use the EditBlock command. See Using the Block Editor.
Note: When opening the Block Editor, only the CustomBlock geometry appears. The origin of the coordinate system is at the Block insertion point.
Adding Elements and Activities
You can use the Block Editor at any time to add elements and activities to a Block definition, which lets you control the Block appearance later, after inserting the Block in the drawing.
Activities specify how to change the Block, while Elements specify the CustomBlock entities that the associated activity affects.
Open the Block definition in the Block Editor, place the suitable element on each entity you want to modify in the Block reference, and apply the required activities. The element defines grip points and custom properties that are visible outside the Block Editor.
In the Block reference, each element appears as a special grip point associated with an activity. Custom properties defined by the element appear in the Properties palette, under Custom. Moving a grip point or modifying a property triggers the associated activity, which changes the appearance of the CustomBlock reference.
Example:
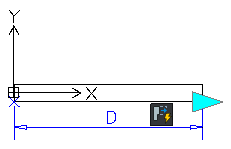
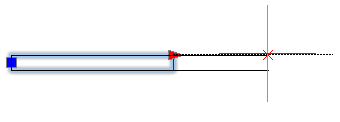
For example, place a linear element (with one grip point) along a wall to specify that you want to change it during the insertion. To change the length of the wall, assign a Stretch activity to the Linear element. In the Block reference, the grip point lets you extend the wall.
Note: You can use elements and activities only in certain combinations. See About Custom Block Elements.
Adding Constraints
Use Constraints in the CustomBlock definitions to specify relationships between entities. The Block Editor provides geometric constraints that you can add to the CustomBlock definition. See Geometric Constraints.
Additionally, you can use Dimensional Constraints tools to maintain specified distance, length, diameter, radius, and angle values between entities of the CustomBlock definition.
Note: Dimensional Constraints are not available in the Block Editor interface.
To add a dimensional Constraint to a Block definition:
- Type EditBlock at the command prompt.
- In the graphics area, specify the Block.
- In the Edit Block dialog box, click OK.
- In the Block Editor, type DimensionalConstraint at the command prompt.
- Follow the command prompts.
- Type CBSave at the command prompt to save the CustomBlock.