Constructing Rectangles
You can draw Rectangles with any size or orientation in the plane with square, filleted, or chamfered corners.
The Rectangle command provides the following options:
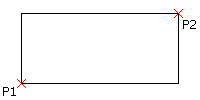
- Corner. Creates a rectangle by specifying two opposite corner points.
- 3 Point Corner. Creates a rectangle by specifying three points.
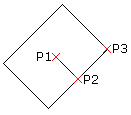
- 3 Point Center. Creates a rectangle by specifying the center of the rectangle, the mid-point of a side and a corner.
- Center. Creates a rectangle by specifying the center of the rectangle and a corner.
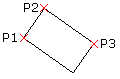
- Parallelogram. Creates a parallelogram by specifying three corner points.
Note: You cannot create parallelograms with chamfered or filleted corners.
To construct a rectangle from two opposite corner points:
- Click Draw > Rectangle (or type Rectangle).
- In the graphics area, specify the start point of the rectangle or specify an option:
- Chamfer. Lets you specify the chamfer distances for each corner.
- Elevation. Lets you specify the elevation of the rectangle in 3D.
- Fillet. Lets you specify the fillet radius for each corner.
- Thickness. Lets you specify the thickness of the rectangle walls in 3D.
- Line width. Lets you specify the 2D line width of the rectangle walls.
- In the graphics area, specify the opposite corner of the rectangle or specify an option:
- Area. Defines the rectangle by the area and the length or width. (Chamfering or filleting of corners is incorporated into rectangle area calculations.)
- Dimensions. Defines the rectangle by length and width.
- Rotation. Rotates the length side of the rectangle by a specified angle before specifying the opposite corner.
To specify rectangle options:
- Type Rectangle at the command prompt.
- Specify an option:
- Chamfer. Lets you specify the chamfer distances for each corner.
- Elevation. Lets you specify the elevation of the rectangle in 3D.
- Fillet. Lets you specify the fillet radius for each corner.
- Thickness. Lets you specify the thickness of the rectangle walls in 3D.
- Line width. Lets you specify the 2D line width of the rectangle walls.
Note: The specified options remain active until you will specify other options.
- Press Enter.
- Repeat step 2 and 3 as necessary to set the options.
- Press Esc to exit the command or specify an option to draw a rectangle.
To construct a rectangle from three points:
- Click Draw > Rectangle > 3 Point Corner (or type Rectangle then specify the 3Corner option).
- In the graphics area, specify:
- First corner point.
- Second corner point to define the first side of the rectangle.
- Third point.
To construct a rectangle from the center, mid-point, and a corner point:
- Click Draw > Rectangle > 3 Point Center (or type Rectangle then specify the 3Point center option).
- In the graphics area, specify:
- Center point of the rectangle.
- The mid-point of a side.
- A corner point.
To construct a rectangle from the center point:
- Click Draw > Rectangle > Center (or type Rectangle then specify the Center option).
- In the graphics area, specify:
- Center point of the rectangle.
- A corner of the rectangle.

To construct a parallelogram:
Note: You cannot create parallelograms with chamfered or filleted corners.
- Click Draw > Rectangle > Parallelogram (or type Rectangle then specify the Parallelogram option).
- In the graphics area, specify:
- First corner of the parallelogram.
- Second point to define the first side of the parallelogram.
- Specify the third point of the parallelogram.
Regular rectangle:
Rectangle with Chamfer option:
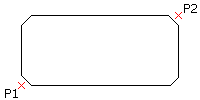
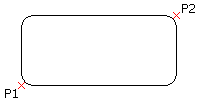
Rectangle with Fillet option:
Access
Command: Rectangle
Menu: Draw > Rectangle
Tool Palettes: Draw > Rectangle
Ribbon: Home > Draw > Rectangle > Corner
Home > Draw > Rectangle > Center
Home > Draw > Rectangle > 3 Point Corner
Home > Draw > Rectangle > 3 Point Center
Home > Draw > Rectangle > Parallelogram 