Using Formulas in Table Cells
In tables, you can use formulas in cells that are calculated based on the values from other cells. The cell that contains a formula displays the calculated value.
If the formula returns an error, the cell displays "####".
A formula is an expression that calculates a value based on the values from the cells specified in the expression.
The following functions are available and can be used in formulas:
- Sum. Calculates the sum of the values from the defined cells.
- Average. Calculates the average of the values from the defined cells.
- Count. Counts the number of defined cells.
Additionally, you can insert expressions to calculate results based on the values from the specified cells and range of cells.
A formula must start always with the equal sign (=) and can contain the following signs:
| Sign | Description |
|---|---|
| + | Plus |
| - | Minus |
| * | Times |
| / | Divided by |
| ^ | Exponent |
| () | Parantheses |
Specifying Cells Within Formulas
You can specify cells and ranges of cells within a formula by selecting them or by referring to them using the column and row labels.
- To refer to a cell in a formula, use its column letter and row number.
Example: A1, D2, C3
- To specify a range of cells in a formula, use the first and the last cells of the range separated with a colon “:”.
Example: A2:B4
- To apply a formula to multiple ranges, use the function followed by one or more ranges within the table in paranthesis separated by commas.
Example: Sum (A2:B2, A3:B3)
If the cell is part of merged cells, use the cell number of the top left cell. If the merged cells contain values, only the value from the top left cell is visible after merging the cells.
Example:
The following table has a cell range A1:G8.
- Merge the cells from A3 through C4.
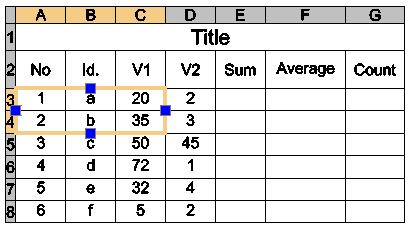
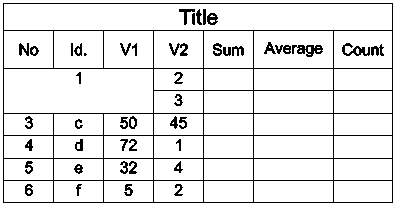
After merging the cells, A3 identifies the merged cell that you can use in all formulas. The new cell displays the value that was previously in A3.
Changing the Cell Data Type
Every cell has an assigned data type.
The default data type is General, but you can change it in the Properties palette or by using the editing tools from the Table contextual ribbon.
The default data type is General, but you can change it in the Properties palette or using the editing tools from the Edit Table contextual toolbar.
The default data type is General, but you can change it in the Properties palette or using the editing tools from the Edit Table contextual toolbar.
Note: You cannot change the data type of a cell that contains a formula.
The following data types are available:
- Angle
- Currency
- Date
- Decimal number
- General
- Note
- Percentage
- Point
- Whole number
Note: If a formula cannot identify the data type, it returns an error and the cell displays "####".
To change the cell data type:
- In the graphics area, click inside a table cell to select it.
- On the ribbon, click Table > Data and select the data type.
- On the Edit Table toolbar, on the Data flyout, select the data type.
- On the Edit Table toolbar, on the Data flyout, select the data type.
Inserting Formulas
You can insert a formula into a cell with several methods:
- Manually
- Using formula tools
- Using the EditTableCell command
- Copying a formula from one cell to another, within the same table or to another table
- Copying a formula from a spreadsheet program
- Automatically filling table cells
Note: You cannot insert formulas in locked cells.
Inserting Formulas Manually
To insert formulas manually:
Note: The formula must start with the equal sign (=).
- Select a table cell to edit it in place:
- Click inside a cell to select it and type = (equal sign).
- or -
- Double-click a cell.
The cell switches to editing mode and the editing tools appear.
- Click inside a cell to select it and type = (equal sign).
- Type the formula.
You can use functions as in the following examples:
- =Sum(C3:D8). Adds the values from the cells in rows 3 through 8 in columns C and D.
- =Average(C3:D8). Calculates the average of the values from the cells in rows 3 through 8 in columns C and D.
- =Count(C3:D8). Counts the number of cells in rows 3 through 8 in columns C and D.
- =(C3+D3)/2. Adds the values of cell C3 and D3 and divides the result by 2.
- Press Enter to calculate the result.
Inserting Formulas Using Formula Tools
Formulas are available for a selected cell on a contextual toolbar or ribbon, according to the selected user interface.
Formulas are available for a selected cell on a contextual toolbar.
Formulas are available for a selected cell on a contextual toolbar.
You can also use these flyouts on the Table contextual ribbon to insert data types and formulas.
You can also use these flyouts on the Edit Table contextual toolbar to insert data types and formulas.
You can also use these flyouts on the Edit Table contextual toolbar to insert data types and formulas.
- Data flyout
 . Lists the available data types.
 - Formula flyout
 . Lists the available functions.
To insert formulas using formula tools:
- Click inside a table cell to select it.
- Do one of the following:
- On the Table contextual ribbon, click the Formula flyout and select a formula.
- On the Edit Table contextual toolbar, click the Formula flyout and select the formula.
- Right-click and click Sum, Average, Count, or Cell.
- Specify the cell or the range of cells corresponding to the selected formula.
- Press Enter to calculate the result.
Inserting Formulas Using the EditTableCell Command
You can use the EditTableCell command to insert formulas and change the data type of cells.
To insert formulas using the EditTableCell command:
- Type EditTableCell at the command prompt.
- In the graphics area, specify a table.
- At the command prompt, specify the cell in which to insert the formula in the format An, where A stands for column indicator(s) and n stands for row number(s).
- Specify the Formula option.
- Use the following options to insert a formula in the specified cell:
- Sum, Average, Count. Inserts the corresponding formula in the specified cell.
To specify the cell range:
- In the graphics area, click inside the first cell of the range.
- Click inside the last cell of the range.
The formula appears containing the specified range as its argument.
- Press Enter to calculate the result.
- Cell. Inserts the selected cell identifier in the formula cell.
- Specify the Cell option.
- In the graphics area, click inside a cell.
The identifier of the specified cell appears in the formula cell.
- Press Enter to calculate the result.
Note: Use the Cell option to select a cell in another table within the same drawing.
- Equation. Switches the formula cell to editing mode and the equal sign appears. Type the equation and press Enter to calculate the result.
- Exit. Exits formula options.
- Sum, Average, Count. Inserts the corresponding formula in the specified cell.
- Repeat step 5 as needed.
- Specify Exit to close the command.
To change the data types of cells:
- Type EditTableCell at the command prompt.
- In the graphics area, specify a table.
- Specify a cell or a range of cells in the format An or An:An, where A stands for column indicator(s) and n stands for row number(s).
- Specify the Datatype option.
- Specify a data type: Angle, Currency, Date, Decimal number, General, Note, Percentage, Point, Whole number.
- Specify Exit to exit the data type selection.
- Specify Exit to close the command.
Copying Formulas to Another Cell
You can copy a formula to another cell within the same table. The range of cells changes according to the new location.
To keep the same range, insert the dollar sign ($) in front of the column or row identifier.
Example:
The following table shows how to control the copy behavior using the dollar sign ($):
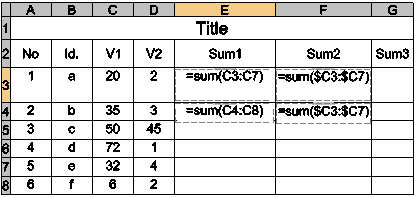
- Cell E3 cell contains: Sum(C3:C7)
If you copy the formula to cell E4, it updates to Sum(C4:C8).
- Cell F3 contains: Sum($C3:$C7)
If you copy the formula to cell F4, it remains unchanged as Sum($C3:$C7).
Parent Topic